
A new HubSpot portal often goes live with duplicate contacts, empty deal stages and marketing emails landing in spam. Sales reps log in twice, find nothing they trust, and drift back to spreadsheets. The software works. The setup order was wrong.
A HubSpot onboarding checklist fixes that order. It lists every setup task from kickoff to go-live. It names an owner for each task and sets a check before the next phase starts.
This HubSpot onboarding checklist covers users, domains, data import, properties, pipelines, each Hub, and the adoption checks that follow launch. Most steps come with a test that proves they are finished.
Key Takeaways
- A HubSpot onboarding checklist works best as six gated phases, each with a named owner and a sign-off.
- Email authentication, permission sets and a validated data import come before any workflow or campaign.
- Adoption checks at 30, 60 and 90 days decide whether the portal becomes the system of record.
What Is a HubSpot Onboarding Checklist?
A HubSpot onboarding checklist is an ordered list of tasks that takes a new portal from purchase to daily use. It covers account settings, data, automation, reporting and training. Each checklist item has an owner, a due date and a way to prove it is done.
A HubSpot onboarding checklist differs from a feature tour. A tour shows what HubSpot can do. A checklist shows what your team must decide and build, in which order, before anyone relies on the data. That order matters because later steps depend on earlier ones.
Three examples show the dependency. Workflows need properties to exist first. Reports need clean deal stages. Marketing emails need an authenticated sending domain. Skip one, and later items on the HubSpot onboarding checklist fail or need rework.
HubSpot onboarding usually covers one or more Hubs. Sales Hub, Marketing Hub and Service Hub share one CRM, so the shared settings come first. Content Hub and Data Hub add website and data-sync work on top. The hub-specific items sit later in the HubSpot onboarding checklist, after the shared foundation.
HubSpot also ships a Checklists tool inside the portal, on Professional and Enterprise plans. It tracks tasks, assignees and due dates, and saves templates. It is a good place to store your HubSpot onboarding checklist. It does not tell you what belongs in that plan.
What Should You Prepare Before Kickoff?
Before kickoff, collect the decisions and access that every later step needs. Teams that start building without them stop in week two to wait for a DNS login or a data owner. Putting these items at the top of the HubSpot onboarding checklist prevents that stall.
- Name an executive sponsor and one HubSpot admin with Super Admin rights.
- Write three to five measurable goals, such as response time to inbound leads.
- List every user with their team, role and the records they should see.
- Get DNS access for the company domain from IT or the web host.
- Export the source data from the old CRM, spreadsheets and email tools.
- Name a data owner who can decide which duplicate record wins.
- List the tools that must connect, such as Gmail, Outlook, Zoom or an ERP.
Goals deserve the most care on any HubSpot onboarding checklist. A vague goal like "better visibility" cannot be checked at go-live. "Every open deal has a close date and amount" can. Unboxx starts every engagement with these goals, the same way the CRM implementation plan article describes for any platform.
If the portal replaces another system, decide now what moves and what stays behind. Old closed deals from five years ago may not need full activity history. That decision often shrinks the migration, since activity records tend to be the largest part of an export.
What Are the 6 Phases of HubSpot Onboarding?
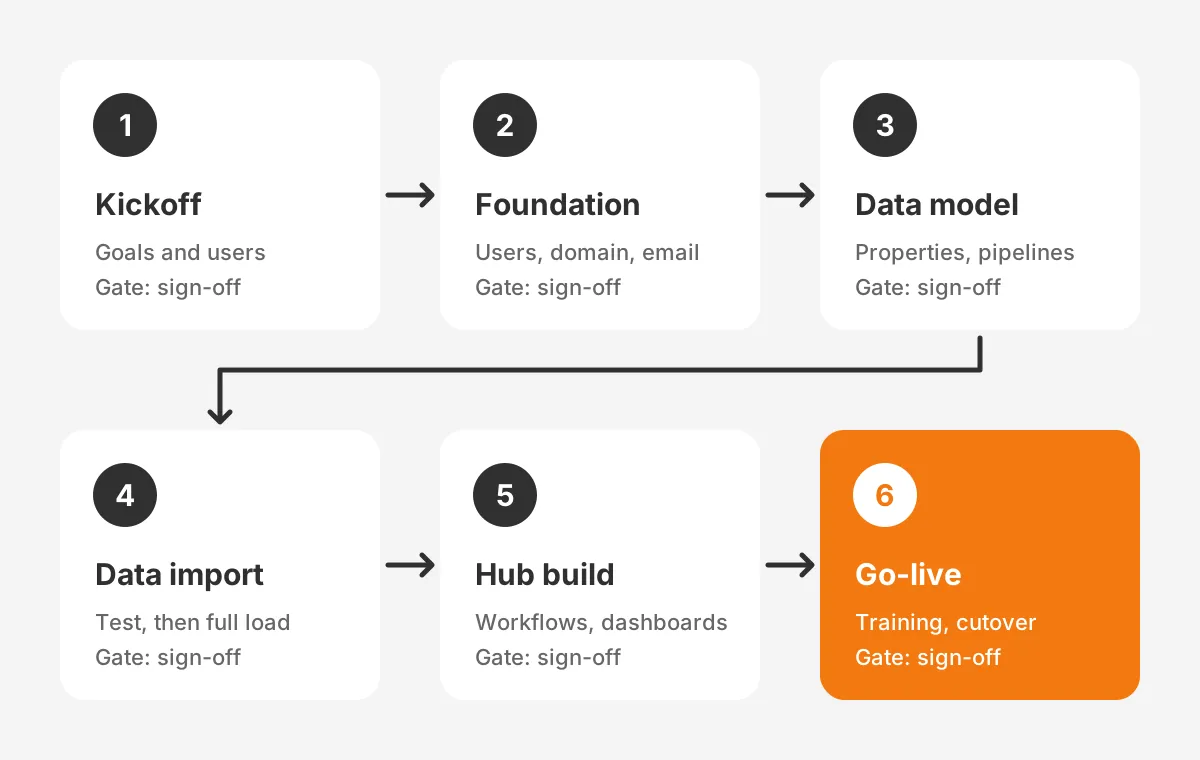
HubSpot onboarding runs best as six phases, each closed by a review gate. The gate is a short meeting where the owner shows the work and the sponsor signs off. Work on the next phase waits for that sign-off.
- Kickoff and discovery: goals, users, data sources and integrations are confirmed.
- Account foundation: users, permission sets, domains, tracking code and email authentication.
- Data model: custom properties, pipelines, deal stages and association labels.
- Data import: mapping, a test load, validation and the full load.
- Hub build: workflows, sequences, forms, ticket routing and dashboards.
- Training and go-live: role-based sessions, a cutover date and the first adoption check.
How long does HubSpot onboarding take? It depends on Hubs, users and data volume. HubSpot partner INSIDEA publishes an eight-week standard plan per Hub. It notes that HubSpot itself does not publish a fixed duration. Treat any figure as a planning estimate.
Here is a worked HubSpot onboarding checklist timeline with assumed figures. A 25-user B2B team on Sales Hub Professional plans two weeks for phases one and two. It plans two weeks for the data model and import. The build gets three weeks and training one, for eight weeks in total.
The phases also make the HubSpot onboarding timeline easy to report. A sponsor can see which gate is next and who owns it. That matters more than the exact week count, because slips show up at the gate instead of at go-live.
How Do You Set Up Users, Domains and Email?
Set up users and permission sets first, then connect the domain and authenticate email. Every later step depends on them. A rep with the wrong view scope sees the wrong deals. An unauthenticated domain hurts email delivery from day one.
Users and permission sets
The HubSpot user permissions guide groups rights into tabs such as CRM, Marketing, Sales, Service, Reporting and Account. Each object has a view scope: all records, the user's team's records, or the user's own records.
Build HubSpot permission sets by role, not by person. A typical B2B portal needs four: sales rep, sales manager, marketer and admin. Keep Super Admin to one or two people. HubSpot does not let a user grant rights they do not hold themselves.
Watch the dependent rights. In workflows, Publish requires View and Edit, and Delete requires Edit. Test each permission set by logging in as a sample user before inviting the whole team.
Domain and email authentication
Email authentication proves to inbox providers that HubSpot may send for your domain. In HubSpot, open settings, then Content, then Domains and URLs. On the Email Sending tab, choose Connect sending domain.
HubSpot's email authentication article lists the records. DKIM uses two CNAME records. SPF and DMARC each use a TXT record. A domain shows as Authenticated only when all three verify.
One rule trips up IT teams. A domain may have only one SPF record. If one exists, add HubSpot's include value to it rather than creating a second record. DNS changes can take 10 to 70 minutes, and up to 48 hours.
Install the HubSpot tracking code on the website in the same phase. Then connect each user's inbox and calendar, so emails and meetings log to contact records from the first day.
How Do You Import and Validate CRM Data?
Import CRM data in a test load first, validate it against the source, then run the full load. That order is how to import data into HubSpot without creating duplicates.
A single unchecked import can create thousands of duplicates that take weeks to merge. The test load is the cheapest item on any HubSpot onboarding checklist. It exposes mapping errors while they affect a sample, not the whole database.
The HubSpot import guide describes the path. Go to Data Management, then Data Integration, then Import data. Advanced imports handle every object type from one file or from separate files that share a key.
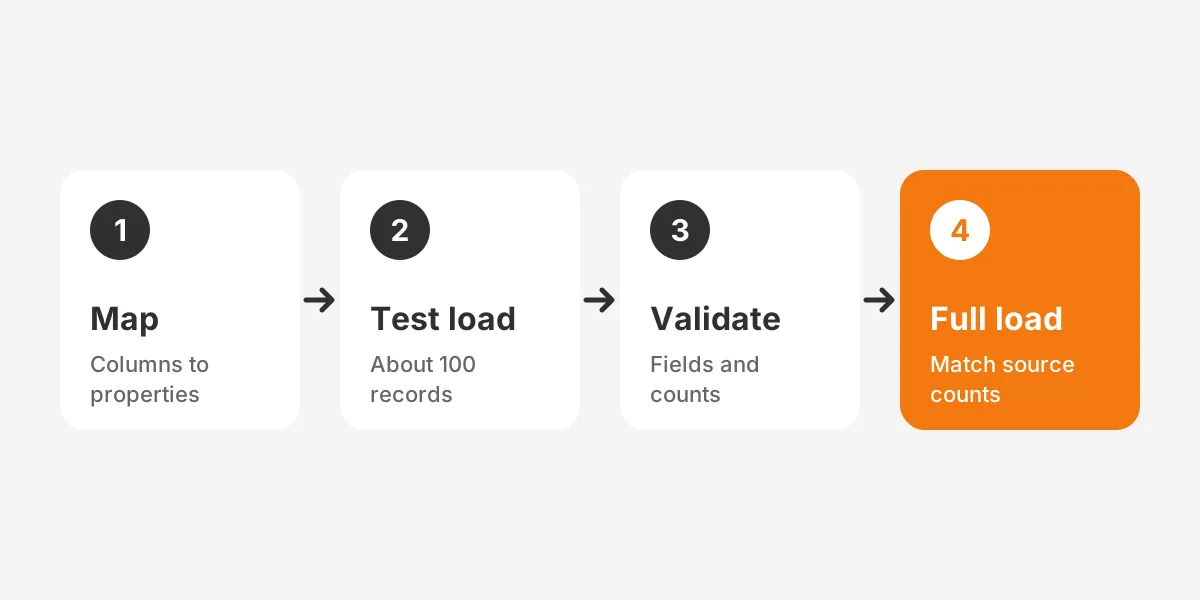
- Clean the source file: remove duplicates, fix email formats and split full names.
- Map each column to a HubSpot property, creating custom properties where none fits.
- Pick the import mode: create and update, create only, or update existing only.
- Load a sample of about 100 records and check every field on five of them.
- Run the full import, then compare record counts with the source by object.
Unique identifiers decide how HubSpot matches records. Contacts match on email, companies on Company Domain Name, and any object on Record ID. A custom property that requires unique values can also act as a key.
Know the limits before you plan. Imports cannot update existing emails, meetings, notes or tasks, so get activity history right the first time. Users also need both Import and Edit rights on the object. The CRM data cleansing runbook covers the cleanup that should happen before any file reaches HubSpot.
A move from Salesforce, Pipedrive or Zoho adds field mapping and owner matching to this step. The HubSpot CRM migration guide covers that work before, during and after the move. Unboxx scopes migrations as part of its CRM consulting and implementation services.
How Should Properties and Pipelines Be Configured?
Configure properties and pipelines to match how your team sells and supports customers, not HubSpot's defaults. Every report and workflow reads these fields. Getting them right in phase three of the HubSpot onboarding checklist saves rebuilding automation later.
Custom properties
Create a property only when a report, workflow or list will use it. In HubSpot, open settings, then Properties, pick the object and choose Create property. The HubSpot properties guide notes that the internal name cannot change after creation.
Pick field types carefully. Changing a field type later can invalidate stored values, so HubSpot advises exporting data first. Dropdowns beat free text for anything you will filter, such as industry, lead source or region.
Deal and ticket pipelines
Pipelines turn deals and tickets into stages you can report on.
HubSpot's default deal stages carry win probabilities from Appointment scheduled at 20% to Contract sent at 90%. B2B teams often rename them to match their own sales process. The table shows how to set up a deal pipeline that reports cleanly.
| Pipeline item | HubSpot default | Typical B2B change |
|---|---|---|
| Deal stages | Appointment scheduled, Qualified to buy, Presentation scheduled, Decision maker bought-in, Contract sent | Discovery, Demo, Proposal, Negotiation, Contract sent |
| Closed stages | Closed won (100%), Closed lost (0%) | Keep both, add a required lost reason |
| Ticket stages | New, Waiting on contact, Waiting on us, Closed | Add a triage stage for priority and routing |
| Custom pipelines | Starter 15, Professional 100, Enterprise 350 | One pipeline per sales motion, such as new business and renewals |
The HubSpot pipelines guide gives those limits for seat-based plans. It also notes that Closed won and Closed lost stages are needed for sales reports. A pipeline that holds records cannot be deleted, so test new pipelines before reps add deals.
Add required properties at each stage. A deal should not reach Proposal without an amount and close date. Those stage rules give managers a forecast they can trust from the first month.
What Does Each Hub Add to the Checklist?
Each Hub adds its own build items on top of the shared foundation. The table below lists what each one adds in phase five. Teams buying two or more Hubs can size the extra work from it.
| Hub | Build items | Proof it is done |
|---|---|---|
| Sales Hub | Deal pipeline, sequences, meeting links, quotes, sales dashboard | Each rep sends a sequence and books a meeting from HubSpot |
| Marketing Hub | Forms, lead scoring, nurture workflows, email templates, campaign reporting | A test lead moves from form fill to sales handoff |
| Service Hub | Ticket pipeline, inbox routing, knowledge base, customer feedback surveys | A test ticket routes to the right agent and closes |
| Content Hub | Website pages, templates, blog setup, domain connection | Pages load on the live domain with tracking active |
| Data Hub | Data sync, data quality rules, custom code actions | Synced records match the source system |
Sales Hub onboarding items
For Sales Hub, the work is the deal pipeline and rep habits. Build three to five sequences for the most common outreach. Add meeting links to every rep's email signature. Then build one HubSpot sales dashboard showing pipeline by stage, by owner and by close month.
Marketing Hub onboarding items
Marketing Hub work follows the lead journey. Build forms first, then lead scoring, then the workflows that hand qualified leads to sales. The HubSpot lead scoring setup guide covers points and thresholds in detail.
Service Hub onboarding items
Service Hub work is about ticket flow. The HubSpot ticket pipeline should match how your team triages requests. Connect the support inbox, set routing rules and define the first service-level targets. Publish five to ten knowledge base articles that answer the most frequent tickets before launch.
How Do You Measure Adoption After Go-Live?
The final part of a HubSpot onboarding checklist measures adoption at 30, 60 and 90 days after go-live. Each check covers usage and data quality. Login counts alone mislead. A rep can log in daily and still keep real deals in a spreadsheet.
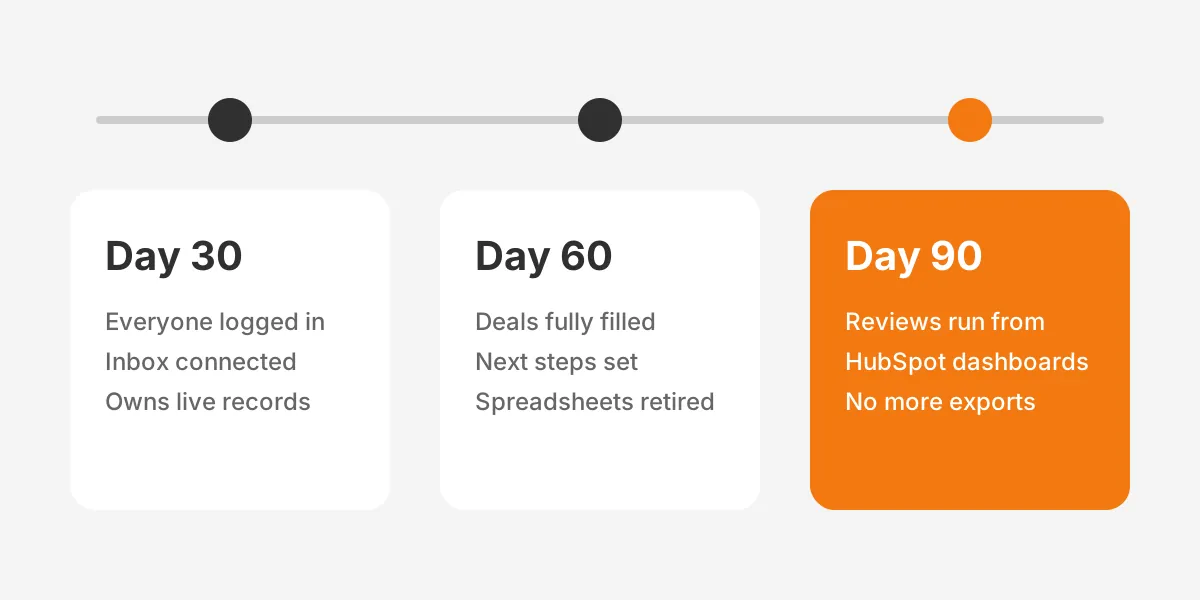
- Day 30: every user has logged in, connected their inbox and owns live records.
- Day 60: open deals have an amount, close date and next step, and old spreadsheets are retired.
- Day 90: managers run pipeline reviews from HubSpot dashboards, not exports.
Pair each check with a data-quality report. Count deals without a close date, contacts without an owner and tickets without a category. Those counts should fall at each checkpoint. If they rise, the cause is usually training or a missing required field.
HubSpot training should follow roles. A rep needs 60 minutes on records, sequences and tasks. A manager needs reports and forecasting. An admin needs permission sets, imports and workflow debugging. Record each session so new hires can watch it later.
Plan support after go-live as part of the HubSpot onboarding checklist itself. Someone must own new property requests, user changes and broken workflows. The CRM administration guide lists those recurring tasks and how often to run them.
What Belongs on a HubSpot Onboarding Checklist Template?
A HubSpot onboarding checklist template holds the same 18 items for most B2B portals. Copy the list below into the HubSpot Checklists tool or a shared sheet. Then add an owner and a due date to each line.
- Goals, sponsor and admin confirmed in writing.
- User list with roles, teams and view scopes.
- Permission sets built and tested by role.
- Sending domain connected, with DKIM, SPF and DMARC verified.
- Tracking code live on every website page.
- Inbox and calendar connected for each user.
- Custom properties created with field types agreed.
- Deal stages renamed, with required fields per stage.
- Ticket pipeline and routing rules defined.
- Source data cleaned and mapped to properties.
- Test load of 100 records checked field by field.
- Full import completed and counts matched.
- Integrations installed from the App Marketplace and tested.
- Forms, lead scoring and handoff workflows live.
- Sequences and meeting links set up for each rep.
- Dashboards built for reps, managers and the sponsor.
- Role-based training delivered and recorded.
- Adoption checks booked for days 30, 60 and 90.
Treat the template as a starting point for your own HubSpot onboarding checklist. A portal with Service Hub adds knowledge base and survey items. A portal replacing Salesforce adds owner matching and activity history. Remove what does not apply rather than leaving lines unticked forever.
Review the HubSpot onboarding checklist at every gate meeting. Items that slip twice need a new owner or a smaller scope. That review keeps the plan honest and shows the sponsor where help is needed.
Who Owns Each Item on the HubSpot Onboarding Checklist?
Each item on the HubSpot onboarding checklist needs one named owner who can decide, plus one reviewer. Shared ownership is a frequent reason a phase slips. When two people own a task, each waits for the other.
| Checklist area | Owner | Reviewer |
|---|---|---|
| Goals and success measures | Executive sponsor | Sales and marketing leads |
| Users and permission sets | HubSpot admin | Team managers |
| Domain and email authentication | IT or web host | HubSpot admin |
| Properties and pipelines | Sales operations or RevOps | Sales manager |
| Data import and validation | Data owner | HubSpot admin |
| Workflows and lead scoring | Marketing operations | Sales manager |
| Training and adoption checks | HubSpot admin | Executive sponsor |
A HubSpot partner can own the build while your team owns the decisions. That split works when the partner documents every setting. Ask for a configuration log next to the HubSpot onboarding checklist. It should list each property, pipeline, workflow and permission set, with its reason.
Smaller teams often combine roles. A 10-person company may have one person as admin, data owner and trainer. That works if the sponsor still reviews each gate. The HubSpot CRM implementation success story shows how Unboxx split that work with a client team.
Frequently Asked Questions
Who should own HubSpot onboarding inside the company?
One HubSpot admin should own HubSpot onboarding day to day, with an executive sponsor who signs off each phase. The admin needs Super Admin rights and time set aside. Sales, marketing and service leads review the items that affect their teams, such as pipelines and routing.
Why do HubSpot rollouts stall after go-live?
HubSpot rollouts usually stall because reps keep working in old spreadsheets and the data in HubSpot goes stale. Missing required fields, weak training and dashboards nobody reviews make this worse. Weekly pipeline reviews run from HubSpot dashboards help, because they make HubSpot the only source for the forecast.
Can a small team onboard HubSpot without a partner?
A small team can onboard HubSpot alone if the data is clean and only one Hub is involved. HubSpot's knowledge base covers every setup screen. A partner helps most with data migration from another CRM and complex permission sets. Integrations and multi-Hub projects also benefit.
What should happen in the first week after launch?
In the first week after launch, the admin should watch for import errors, broken workflows and permission complaints. Hold a 15-minute daily check-in with team leads. Log every issue, fix the blockers first, and confirm no team has returned to the old system.
How do you keep HubSpot data clean after onboarding?
Keep HubSpot data clean with required fields at each deal stage and dropdown properties instead of free text. Add a monthly duplicate review. Assign one owner for data quality. Run a short report on records missing owners, close dates or lifecycle stages, and fix them every week.
How Can Unboxx Help With Your HubSpot Onboarding Checklist?
Unboxx helps B2B teams turn a HubSpot onboarding checklist into a working portal. The team sets up permission sets, migrates and validates data, builds pipelines and workflows, and trains each role. Every setting is documented, so your admin can run the portal after handover.
If you are planning a HubSpot rollout or fixing one that stalled, book a consultation with Unboxx. The first session reviews your goals, data sources and current setup. It maps them to a phased HubSpot onboarding checklist with named owners.
Let's create something out of this world together.
Have a project in mind? Contact us for expert design and development solutions. Let's discuss how we can help grow your business.
Ready to Unboxx Your Potential?
Build smarter systems. Automate faster. Scale confidently.